Yamaha RX-V367 User Manual: Comprehensive Guide
This comprehensive guide details the Yamaha RX-V367 receiver, covering setup, remote operation, network connectivity, troubleshooting, and firmware updates as of December 22, 2025․
The Yamaha RX-V367 is a versatile AV receiver designed to deliver immersive audio experiences for home entertainment․ This receiver, documented in a free online manual rated 8․5/10 by 37 users (as of March 18, 2023), supports various audio formats and connectivity options․ Users in late 2025 have reported issues with Spotify Lossless and NetRadio functionality, requiring troubleshooting․
This guide provides detailed instructions for setting up and operating the RX-V367, including connecting speakers, TVs, and external devices․ It also covers remote control programming, network configuration, and resolving common problems․ Yamaha Music ID registration is also explained․
Key Features and Specifications
The Yamaha RX-V367 boasts key features for enhanced audio-visual enjoyment․ While specific technical specifications aren’t detailed in the provided snippets, it supports connections for Blu-ray players, DVDs, and TVs․ Network connectivity via Wi-Fi or Ethernet enables streaming services, though recent reports (December 2025) indicate potential issues with Spotify Lossless compatibility, triggering error messages․

Users have experienced NetRadio access failures since November 2023, potentially linked to Fritzbox configurations․ The receiver is compatible with Yamaha Music ID registration for added features and support․
Setting Up the RX-V367
Initial setup of the Yamaha RX-V367 requires careful attention to connections․ Begin by connecting your speakers and the power cord, ensuring secure placement․ Subsequently, connect the receiver to your TV using the appropriate cables․ The user manual (available online as of March 18, 2023) provides detailed diagrams for these connections․

Programming the remote control to operate your TV is also crucial, utilizing the codes found within the receiver’s documentation․ Proper setup is vital for optimal performance and functionality․
Initial Connections: Speakers and Power
Begin by securely connecting your speakers to the RX-V367’s designated terminals, matching positive and negative polarities․ Ensure the receiver is powered off during this process․ Next, connect the power cord to a grounded outlet․ Double-check all speaker wire connections for stability․
Refer to the owner’s manual (rated 8․5/10 by 37 users as of March 18, 2023) for specific wiring configurations based on your speaker setup․ Proper initial connections are fundamental for optimal audio quality and safe operation․
Connecting to Your TV
Connect the RX-V367 to your TV using an HDMI cable for both audio and video․ Utilize the ARC (Audio Return Channel) HDMI input on your TV for simplified audio transmission․ Alternatively, an optical cable can be used for audio if ARC isn’t available․
Ensure the correct HDMI input is selected on both the receiver and the TV․ Refer to the Yamaha RX-V367 owner’s manual for detailed instructions and troubleshooting tips regarding TV connectivity, as reported by users in 2025․
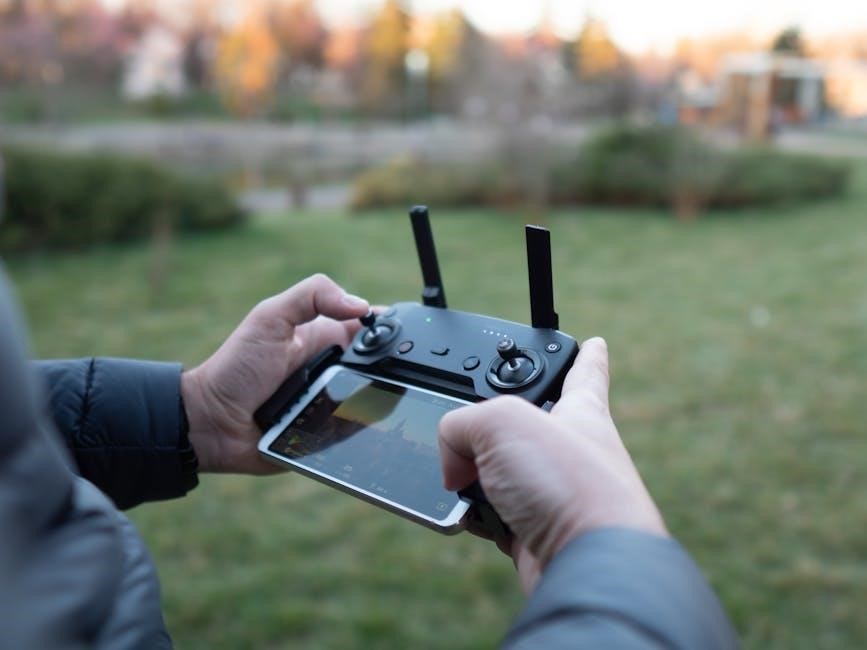
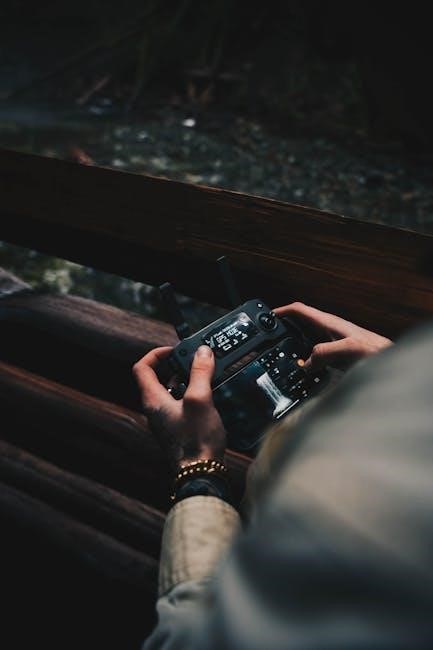
Remote Control Operation
The Yamaha RX-V367 remote facilitates effortless control of your receiver’s functions․ Initial setup may require programming the remote to operate your TV, utilizing codes available in the owner’s manual or online resources․ Familiarize yourself with key buttons for power, volume, input selection, and sound mode adjustments․
Users in 2025 have reported successful programming using the provided codes․ Refer to the manual for detailed button explanations and troubleshooting steps if the remote isn’t responding as expected․
Programming the Remote Control
To program the Yamaha RX-V367 remote, first ensure the receiver is powered on․ Locate the appropriate code for your TV brand within the manual or online database․ Enter the code using the setup button and number keys, following the on-screen prompts․ If the initial code fails, try alternative codes listed for your TV manufacturer․
As of late 2025, users report success with this method․ A downloaded RX-V367 manual (1․2MB) provides detailed instructions․ Confirm functionality by testing volume and power control of your television․
Understanding Remote Control Buttons
The Yamaha RX-V367 remote features dedicated buttons for power, volume, input selection, and sound mode control․ The ‘Scene’ buttons allow for preset listening configurations․ Navigation is managed via directional arrows and an ‘Enter’ button․ The ‘Setup’ button accesses system settings and remote programming functions․
Users should familiarize themselves with the ‘NetRadio’ button for internet radio access, though recent reports (November 2023 & 2025) indicate potential connectivity issues․ Refer to the downloaded manual for a complete button layout and function descriptions․
Audio Input/Output Options
The Yamaha RX-V367 offers versatile connectivity, including HDMI inputs for Blu-ray players and other devices․ It also features optical and coaxial digital audio inputs for compatibility with older systems․ Analog audio inputs accommodate traditional sources․ Output options include HDMI for TV connection and speaker terminals for a surround sound setup․

Ensure proper cable connections for optimal audio quality․ Recent forum discussions (October 2025) highlight potential issues with NetRadio, unrelated to standard audio inputs, but worth noting during overall system checks․
Connecting External Devices (Blu-ray, DVD, etc․)
To connect Blu-ray or DVD players, use HDMI cables for both audio and video․ Plug one end into the device’s HDMI output and the other into an available HDMI input on the RX-V367․ Power on both devices․ Select the corresponding HDMI input on the receiver using the remote control․
Ensure HDCP compatibility for protected content․ Refer to the owner’s manual (March 18, 2023) for specific input assignments․ Remember, recent reports (August 2, 2025) focus on unrelated Yamaha motorcycle issues․
Digital Audio Inputs (Optical, Coaxial)
Utilize optical (Toslink) or coaxial digital audio inputs for connecting devices lacking HDMI․ Connect the optical cable from your device’s output to the RX-V367’s optical input․ For coaxial, use a coaxial cable․ Select the appropriate input on the receiver․
These connections transmit digital audio signals, ensuring high-quality sound․ Check device compatibility and ensure proper cable connections․ Note that network radio issues (November 9, 2023) are separate from these input configurations, and Spotify Lossless had issues (September 14, 2025)․
Network Connectivity and Streaming
Connect your RX-V367 to your home network via Wi-Fi or Ethernet for streaming capabilities․ Access network settings through the on-screen display (OSD)․ Ensure a stable connection for uninterrupted audio․ Recent reports (November 2023) indicate potential NetRadio access errors; troubleshooting may be required․
Spotify Lossless compatibility experienced issues (September 14, 2025) with some Yamaha receivers, including the RX-A 2070․ Verify firmware is updated for optimal performance․ Regularly check for updates to maintain functionality;
Connecting to Your Home Network (Wi-Fi/Ethernet)
Establish network connectivity via Wi-Fi or a wired Ethernet connection․ Access network settings through the receiver’s on-screen display (OSD)․ For Wi-Fi, select your network and enter the password․ Ethernet provides a more stable connection․

Troubleshooting network issues is crucial; ensure your router functions correctly․ Recent user reports (November 2023) highlight potential access errors with NetRadio․ A stable network is essential for seamless streaming and accessing internet radio stations․
Spotify Lossless Compatibility & Troubleshooting
Spotify Lossless is now available, but compatibility with the RX-V367 may require verification․ Some users with Yamaha RX-A 2070 receivers have reported error messages upon connection․ Ensure your receiver’s firmware is up-to-date for optimal performance․
If encountering issues, check your network connection and Spotify account status․ Confirm the RX-V367 supports the necessary audio codecs for lossless streaming․ Troubleshooting steps may involve restarting both the receiver and the Spotify application․
Radio Functionality
The Yamaha RX-V367 offers both traditional FM/AM radio tuning and access to Internet Radio via NetRadio․ For optimal FM/AM reception, ensure proper antenna connections and positioning․ NetRadio functionality has experienced recent issues for some users, displaying “Access Error” messages․
Troubleshooting NetRadio problems may involve verifying your network connection and checking Yamaha’s service status․ Users report issues starting November 9, 2023, impacting multiple Yamaha devices․ Consult the Yamaha forum for community solutions and updates․
FM/AM Radio Tuning
To tune FM/AM radio on your Yamaha RX-V367, first ensure the appropriate antenna is connected securely․ Use the tuner selection button on the front panel or remote to choose FM or AM․ Utilize the tuning up/down buttons, or direct frequency input via the numeric keypad, to locate desired stations․

For improved FM reception, adjust antenna orientation․ The RX-V367 allows storing favorite stations for quick access․ Refer to the on-screen display for signal strength indicators and station information․ Weak signals may require antenna adjustments or relocation․
Internet Radio Access & Troubleshooting (NetRadio Issues)
Accessing Internet Radio on your Yamaha RX-V367 requires a stable network connection․ Navigate to the NetRadio menu via the receiver’s interface․ Browse stations by genre, region, or search directly․ Recent reports (November 9, 2023, and onward) indicate potential “Access Error” issues affecting multiple Yamaha devices․

Troubleshooting: Verify network connectivity, check your Fritzbox (if applicable), and ensure firmware is up-to-date․ Restarting the receiver and router often resolves temporary glitches․ If problems persist, consult Yamaha support for assistance․
Troubleshooting Common Issues
Addressing common problems with your Yamaha RX-V367 is crucial for optimal performance․ No Sound Output: Verify speaker connections, input selection, and volume levels․ Check if the receiver is muted․ Network Connection Problems: Ensure a stable internet connection, confirm correct network settings, and restart both the receiver and your router․
NetRadio Issues: As reported since November 2023, access errors may occur; troubleshooting steps are detailed elsewhere in this manual․ Consult the online resources for further assistance․
No Sound Output
Experiencing no sound from your Yamaha RX-V367? Begin by meticulously checking all speaker connections – ensure they are secure and correctly wired․ Verify the selected input source matches the connected device․ Confirm the receiver’s volume isn’t muted and is set to an audible level․
Double-check the speaker settings within the receiver’s on-screen display (OSD)․ If the issue persists, test with different audio sources to isolate the problem․ A faulty speaker cable could also be the culprit․
Network Connection Problems
Encountering network issues with your Yamaha RX-V367? First, confirm your home network is functioning correctly with other devices․ Verify the receiver is within range of your Wi-Fi router, or that the Ethernet cable is securely connected;
Within the receiver’s settings, double-check the network configuration – IP address, gateway, and DNS settings․ Recent reports from November 2023 indicate potential NetRadio access errors; try restarting both the receiver and your router․ Ensure firmware is up-to-date․
Understanding the On-Screen Display (OSD)
The RX-V367’s On-Screen Display (OSD) provides visual access to settings and information․ Navigate using the remote control’s cursor keys․ The OSD displays input source, sound modes, network status, and setup options․
Access the OSD by pressing the “Setup” button on the remote․ Explore menus for audio adjustments, speaker configuration, and system information․ Familiarize yourself with the layout for efficient control․ The OSD reflects current settings, aiding troubleshooting and customization․ Refer to the manual for detailed explanations of each option․
Firmware Updates
Maintaining updated firmware is crucial for optimal RX-V367 performance and compatibility․ Yamaha periodically releases updates addressing bugs and adding features․ Check for updates through the receiver’s setup menu, requiring a network connection․
Download updates directly to the unit via Wi-Fi or Ethernet․ Ensure a stable connection during the update process, which can take several minutes․ Do not interrupt power during a firmware update, as this could damage the receiver․ Follow on-screen prompts carefully for a successful installation․
Checking for Updates
To check for firmware updates on your RX-V367, navigate to the “Setup” menu using the remote control․ Within Setup, locate the “System” or “Information” section – menu names may vary slightly․ Select “Firmware Update” or a similar option․
The receiver will then attempt to connect to Yamaha’s servers and verify if a newer version is available․ If an update is found, the receiver will display the version number and prompt you to begin the download and installation process․
Performing a Firmware Update
Before starting, ensure a stable power connection to your RX-V367; Select “Update” when prompted after verifying a new firmware version․ The receiver will download the update – do not interrupt this process․
Once downloaded, the receiver will automatically install the firmware․ A progress bar will indicate the installation status․ Avoid turning off the receiver during the update; interruption could cause permanent damage․ Upon completion, the receiver will restart automatically, applying the new firmware․
Safety Precautions and Maintenance
To ensure safe operation, avoid placing the RX-V367 near heat sources or in direct sunlight․ Do not expose the unit to rain or moisture․ Regularly clean the exterior with a soft, dry cloth; avoid liquids․
Internal maintenance should only be performed by qualified personnel․ Disconnect the power cord before cleaning or during extended periods of non-use․ Ensure adequate ventilation around the receiver to prevent overheating․ Never attempt to disassemble or modify the unit․
Technical Support and Warranty Information
For technical assistance, visit the official Yamaha website or contact Yamaha customer support․ Warranty coverage details vary by region; refer to your purchase documentation for specifics․
Yamaha Corporation of America provides support resources online, including FAQs and troubleshooting guides․ Warranty typically covers defects in materials and workmanship for one year from the date of purchase․ Extended warranties may be available․ Register your RX-V367 via Yamaha Music ID for enhanced support․
Yamaha Music ID Registration
Yamaha Music ID enhances your RX-V367 experience, providing access to exclusive benefits and streamlined support․ Registration allows for easier firmware updates and personalized settings synchronization․
Create an account on the Yamaha website and register your receiver using its serial number․ This unlocks access to the Yamaha MusicCast ecosystem and potential future features․ Yamaha recommends registration for optimal product support and to stay informed about relevant updates and promotions․ It’s a free and valuable service!
RX-V367 Manual Download & Resources

Access the complete RX-V367 owner’s manual directly from the Yamaha website․ A downloadable PDF version, approximately 1․2MB in size, provides detailed instructions and troubleshooting guidance․ Yamaha also offers supplementary resources, including brochures and data sheets, for a comprehensive understanding of your receiver․
Find helpful documents and frequently asked questions on the official Yamaha support page․ Registration with Yamaha Music ID may unlock additional exclusive content․ Ensure you have the latest manual version for accurate information as of December 22, 2025․